Mountain Lions in Missouri
February 7th, 2017 by BTC Editor
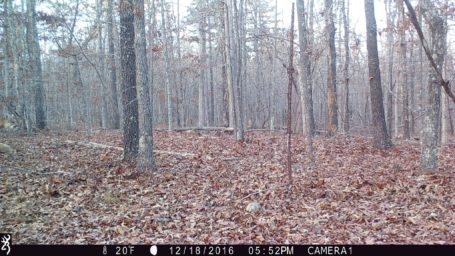
What is one of the neatest things you’ve captured on your game cameras? For Darryl Esthay from Louisiana it was photos of a mountain lion on a piece of property he hunts in Missouri, a very rare sight for the Show-Me-State! Being from Missouri myself, I know how big of a deal it is to the residents here to learn that there are mountain lions in our state. I contacted Darryl to get the story behind the photos and to find out what is involved in reporting a mountain lion sighting in Missouri.
The Story
According to Darryl, he went to his hunting property in Oregon County, Missouri for his final deer hunt of the year on 1/02/2017. That afternoon, he pulled his SD cards on his Browning Strike Force Trail Cameras and found this series of mountain lion pictures on one of them. He then contacted the Missouri Department of Conservation (MDC) who sent their Mountain Lion Response Team to investigate the “possible” sighting, later officially confirming that this indeed is a mountain lion.
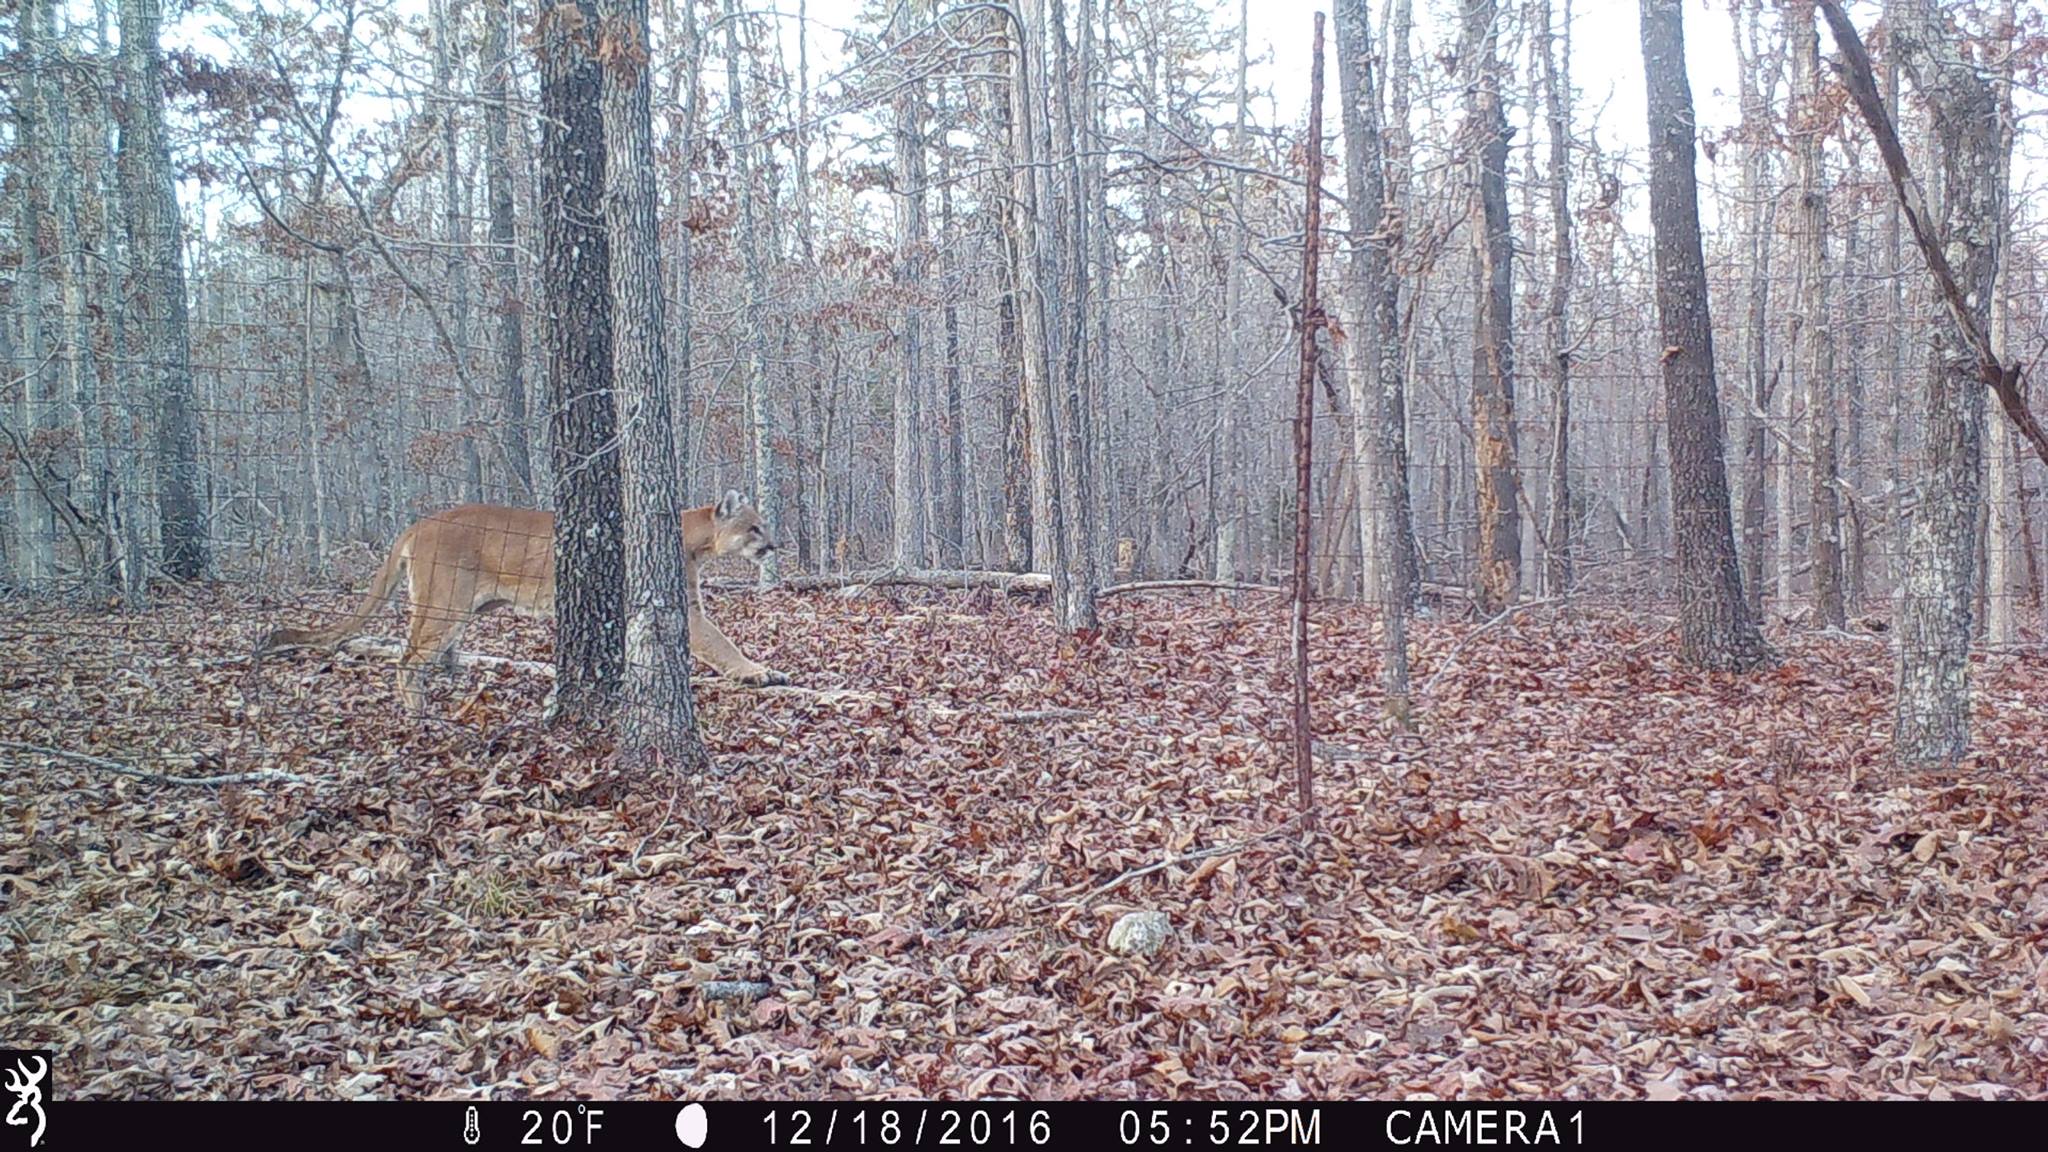
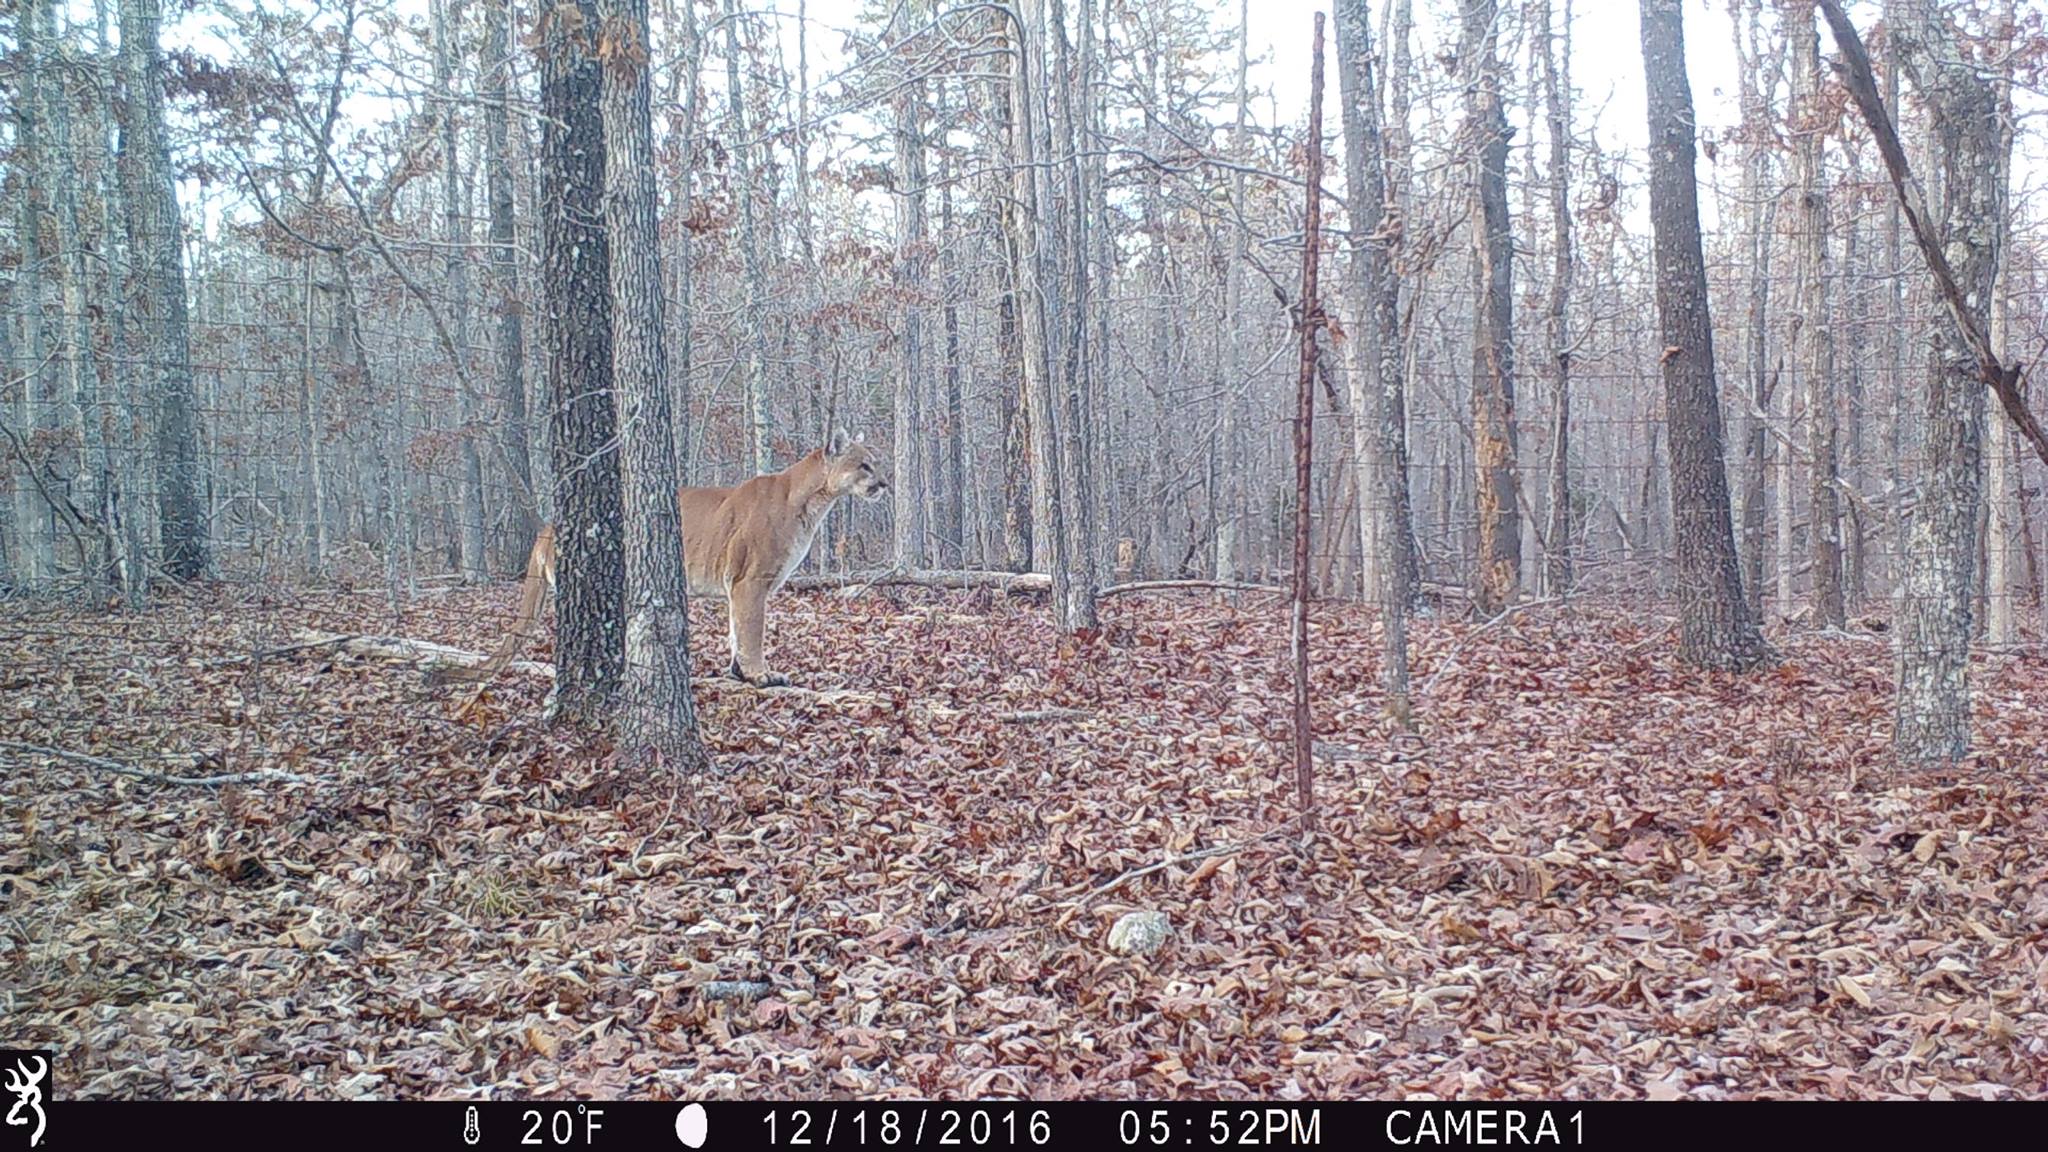
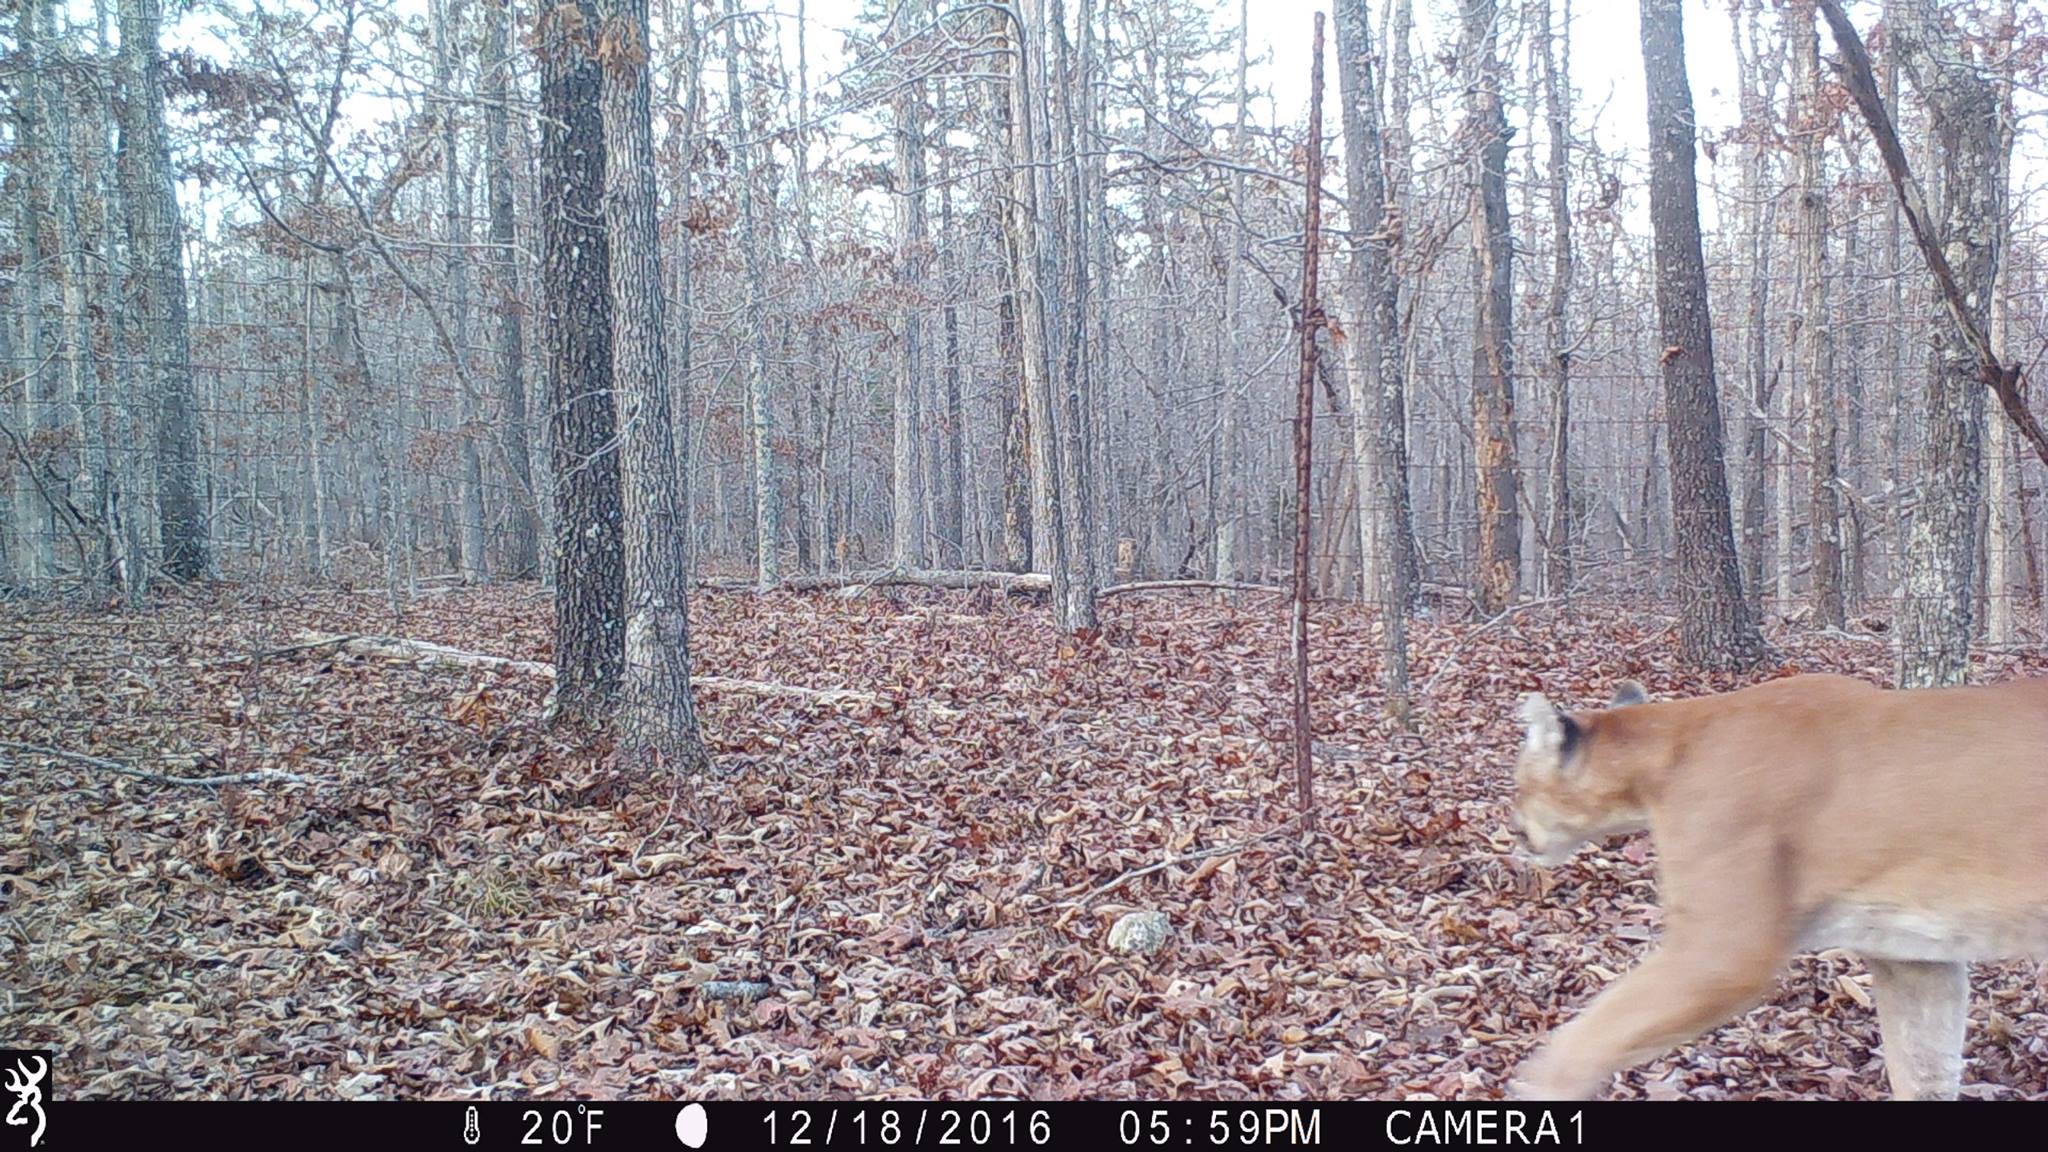
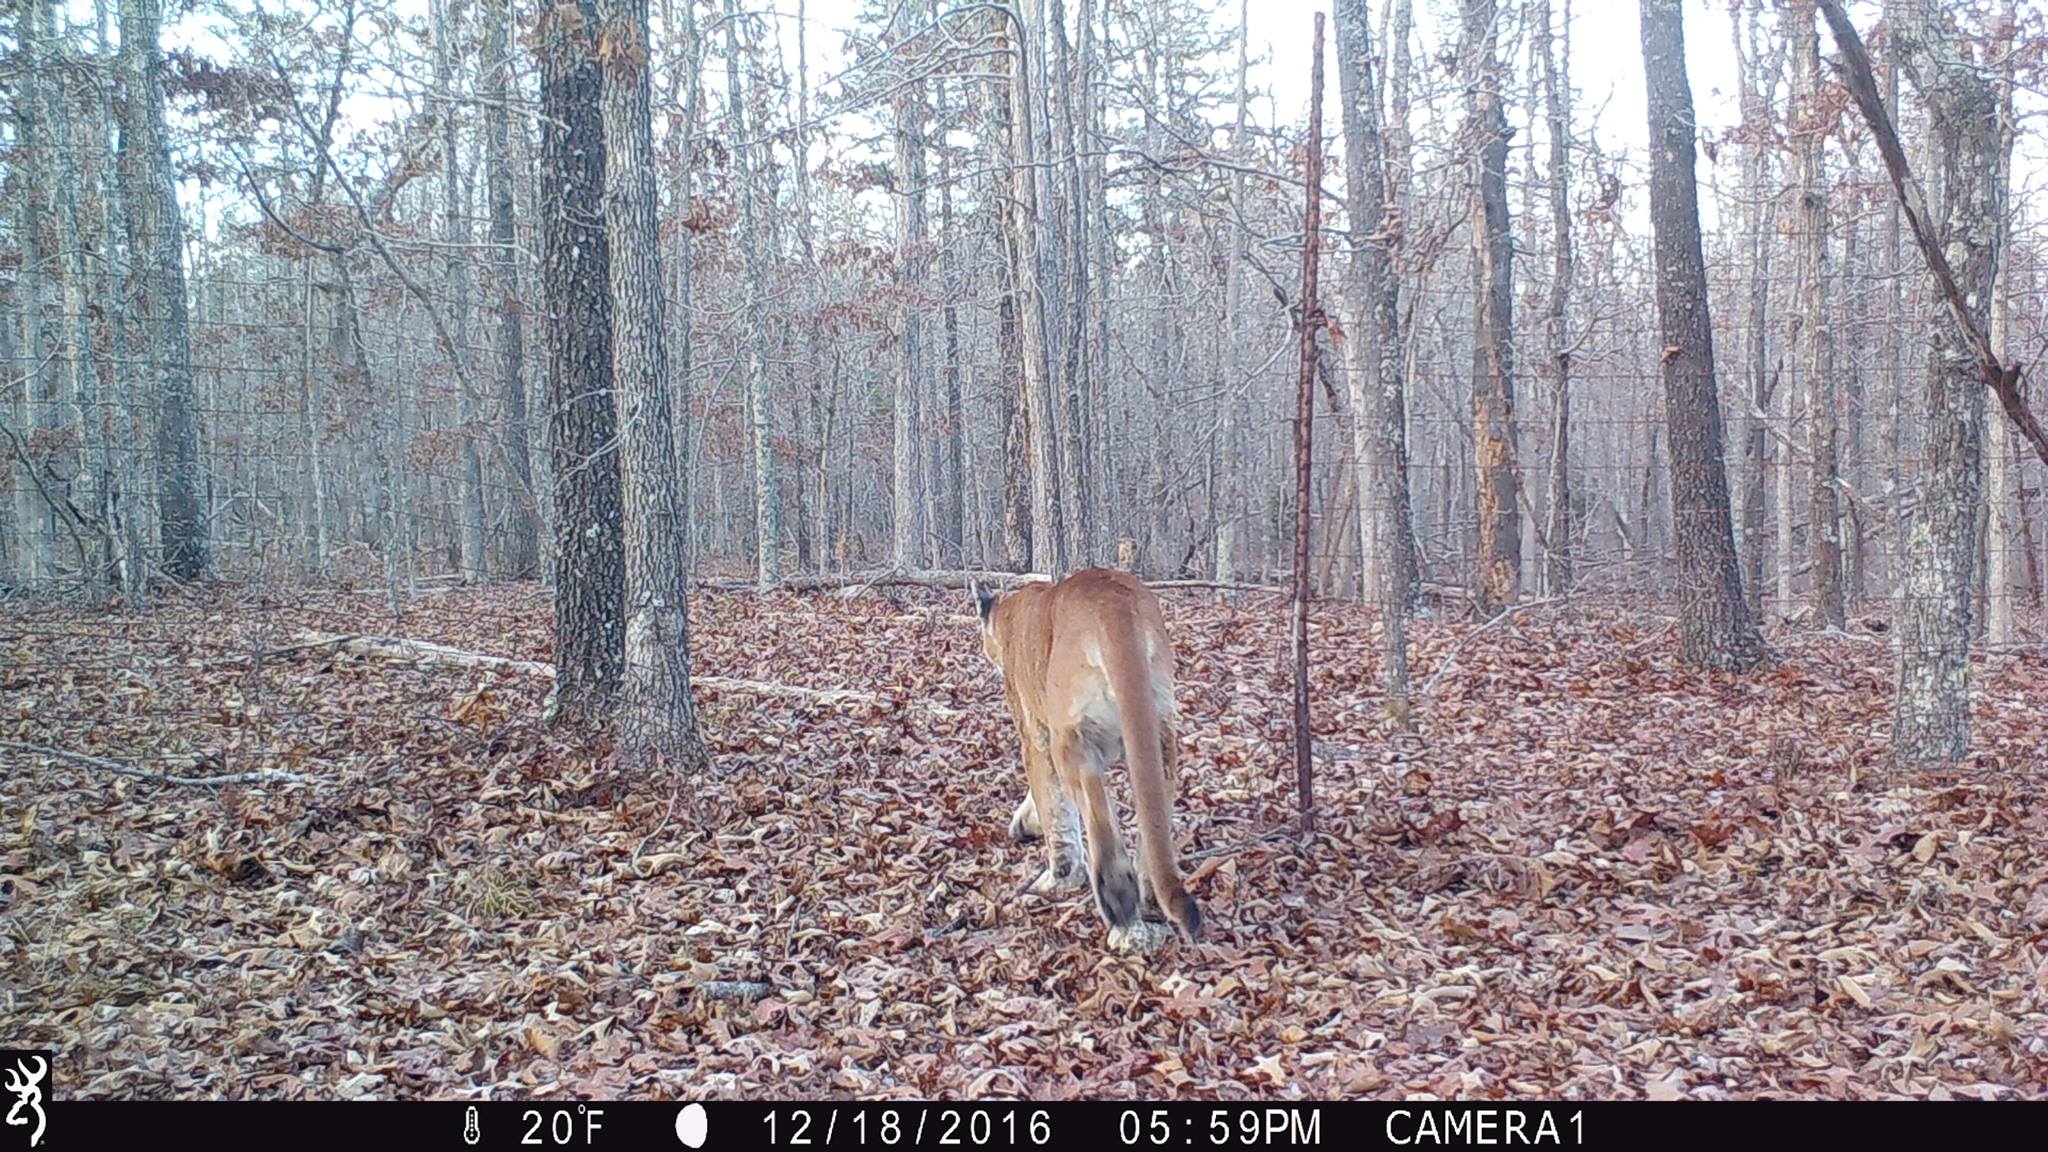

Darryl states that they were very thorough in gathering their evidence. They asked to see the original SD card that the mountain lion pictures were on, which Darryl presented to them. They saved the mountain lion photos, as well as the two photos before and the two photos after, to help support their evidence.
Next, the Mountain Lion Response Team asked to see the location that Darryl’s Browning Trail Camera was hung. They spotted the different landmarks that were in the photo: the fence, the rock & the log, and verified that it was the same location that the mountain lion pictures were taken. Darryl states that the “high fence” that is in the photos is actually an old fox pen from years ago that was there when he bought the property. He has cut 5-6 foot holes all along the fence to allow wildlife to pass through, as you can see in the photos.
After verifying the location was the same as in the photos, they then looked for mountain lion hair, scat and tracks in the area, but so far none were found. All of the gathered evidence was then presented to the entire Mountain Lion Response Team and was later officially confirmed as a mountain lion sighting in Missouri.
About a week later, Darryl also got a video of a gray fox, and what could possibly be another mountain lion in the bottom right-hand corner. The Mountain Lion Response Team looked at this video as well but they were not able to confirm that it was a mountain lion. They advised Darryl that once all the evidence is gathered after investigating a possible sighting, it is then voted on by the Mountain Lion Response Team. Each member of the team must vote “yes” in order for it to be a confirmed sighting. Even if the majority of the team believes it is, it’s not officially confirmed unless 100% of the team is positive that what they are looking at is a mountain lion.
(Click here to see a list of all of the confirmed sightings in Missouri.)
Other Evidence
Trail camera photos aren’t the only recent evidence of mountain lions in Missouri. According to an article in the Springfield News-Leader dated 1/27/17, the first confirmed female mountain lion in Missouri since 1994 killed an elk in Shannon County. Here are a couple of excerpts from the article:
“DNA from the cat’s saliva showed it likely originated from the Black Hills of Wyoming and South Dakota and northwest Nebraska. Conlee (A furbearer biologist for the MDC) said it’s a significant find because female mountain lions typically don’t travel long distances, preferring to live and hunt near where they were born.”
“There’s no indication the female mountain lion is staying in Shannon County, Conlee said, and it’s possible the cat will continue moving…Conlee emphasized there is still no evidence that Missouri has a breeding population of mountain lions.”
According to the Missouri Department of Conservation, there have been 68 confirmed mountain lion sightings in Missouri since 1994, becoming more common in recent years. This could be due to the growing number of mountain lions out west, making their way into Missouri, or could possibly be due to an increasing number of trail cameras out in the woods.
I have lived in Missouri all my life and I have never personally seen a mountain lion or gotten pictures of one on my game cameras, though I have heard stories of our neighbors seeing some behind our home for years now. My husband said his great-grandfather told his family he was riding his horse on our property one day and the horse he was on was attacked by a mountain lion. How true that is we may never know!
Part of the excitement of running trail cameras is never knowing what you’ll get pictures of. If you’ve already taken down your game cameras for the year, I suggest hanging a few back up to see what types of wildlife you get pictures of! Although it is still extremely rare, mountain lion sightings are becoming more common in Missouri. If you think you’ve seen one and have a good amount of evidence, follow this link for instructions on how to report it to the Missouri Department of Conservation.
By Andrea Haas
Andrea Haas is a Pro-Staffer from Missouri who enjoys hunting deer, turkeys, and upland birds. She is also the founder of the Huntress View, an organization formed to help strengthen the ever growing community of women hunters.
4 Reasons to Start Hunting in 2017
January 29th, 2017 by BTC Editor
When making your list of New Years resolutions for 2017, I hope plenty of you have added “hunting” to the list of things you’d like to check off this year. Whether it turns into a life-long passion or something you decide may not be for you, I’m sure either way you will walk away a better person from the experience. Here are 4 positive things you can expect to happen from giving hunting a try.
Healthier Lifestyle
Almost everybody makes it a New Years Resolution to become healthier in the coming year, and being a hunter can help you reach that goal! Aside from the fact that the meat from the animals you harvest will be organic, leaner, and free from man-made intervention, most hunts require a good amount of physical activity as well. So you’re getting your exercise in while you are obtaining a healthier form of food. It’s a win-win!
Strengthen the Economy
You may not necessarily feel that you alone can help contribute to this, but check out this statistic: According to the National Shooting Sports Foundation (NSSF), hunting has generated 600,000 jobs in the United States. That’s a HUGE number. And just think, the more you and others hunt, the more purchases you will make within the hunting industry that will help that number continue to grow!
Conservation
If there is one thing that hunters and non-hunters can agree on, I feel it’s the fact that we all want to ensure that nature and wild animals will be around for future generations to enjoy. You can help contribute to that through hunting. Check out these excerpts from the NSSF Hunter’s Pocket Fact Card about how hunters contribute to conservation:
“License Revenues fund nearly half the budget, on average, for state fish and wildlife agencies. The money supports wildlife management and restoration programs, habitat improvement and general conservation efforts.”
“Excise Taxes on sporting equipment (such as firearms, ammunition and fishing tackle) provide more than one-fifth the revenue for state fish and wildlife agencies. The funds are used to acquire, maintain and improve wildlife habitat and to make the nation’s lands and waters more accessible and enjoyable to all its citizens, sportsmen and non-sportsmen alike.”
Allison Stegmann, Huntress View team member
“Hunters and anglers provide more than 75% of the annual funds of the 50 state conservation agencies. Sportsmen are clearly the largest contributors to conservation, paying for programs that benefit all Americans and all wildlife.”
Character Building
I have been hunting for years now, but I still remember how I felt after my very first whitetail hunt and what I learned from it. I remember climbing up in the tree and seeing 3 does walk underneath my treestand. At the time I didn’t want to shoot anything, I just wanted to observe them, and I’m glad I did. Just watching them in their natural environment, not having a clue that anyone else was there, was quite the experience for me.
That day I learned to appreciate several things: Having land to hunt on, having the ability to get out and go hunting in the first place (which I feel a lot of people take for granted), and for life itself. While hunting can be very difficult, I realized how easily I could have taken one of those does with my rifle that day, had I wanted to, and it just made me have a new found respect for wildlife.
If you’ve been thinking about hunting for a while but haven’t taken the leap yet, please give it a try this year! There is always something positive that one can take away from hunting. I encourage you to see how it can help change you for the better!
By Andrea Haas
Andrea Haas is a Pro-Staffer from Missouri who enjoys hunting deer, turkeys, and upland birds. She is also the founder of the Huntress View, an organization formed to help strengthen the ever growing community of women hunters.
Homemade Venison Bratwurst Recipe
January 9th, 2017 by BTC Editor
Making bratwursts or summer sausage is an easy way to use the meat from a whole deer, especially a large or older buck or doe that will likely be tough. Below are step-by-step instructions to making your own homemade venison brats.
What You’ll Need
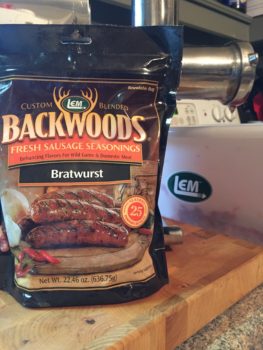
- Meat from whole deer (20-25 lbs. deboned meat)
- 5 lbs. pork or beef fat
- 2 lbs. cheese – pepperjack or cheddar
- Lem’s Brat seasoning + water according to package
- Natural casings for 25 lbs. meat
- Meat grinder
- Sausage stuffer
The Process
Step 1: Debone meat
Debone shoulders and hams from a whole deer, removing fat and sinew. Use neck and rib meat if needed, to get a total of 20-25 lbs.
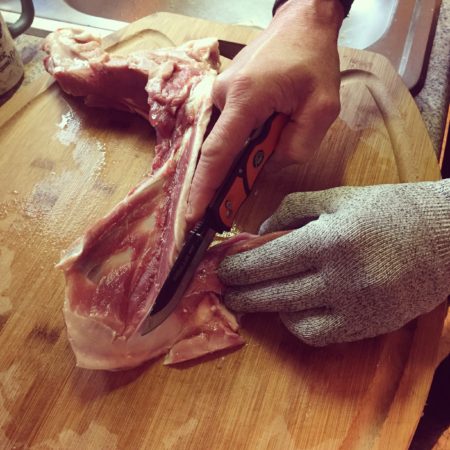
Tips!
- Use cut-resistant gloves when deboning meat for added safety
- Make sure to use a sharp knife, such as the Outdoor Edge Razor-Lite replaceable-blade knife
Step 2: Grind
Using an electric grinder, grind all venison into a meat tub or large pot. Grind pork or beef fat separately, and then mix into venison until distributed evenly throughout.
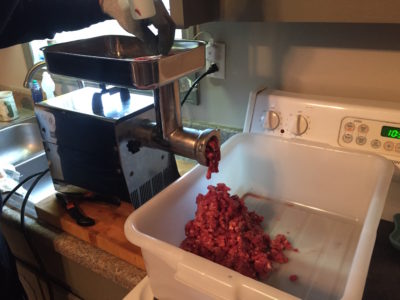
Tips!
- I recommend the Lem #8 meat grinder from Bass Pro Shops. We purchased ours nine years ago, and have ground more than 1,500 lbs. of meat—including 40+ deer, buffalo, hogs and elk. Still works perfectly with no issues.
- There are several ways to obtain pork or beef fat. Ask your local meat store or grocery store if they sell it, or contact a local farmer. We raised a domestic hog and saved the fat once we butchered it. You can also substitute bacon for the fat.
- Before grinding the fat, let it freeze slightly so it makes pellets when ground. If it’s too soft and warm, it will be greasy and melt when grinding.
Step 3: Add the Seasoning
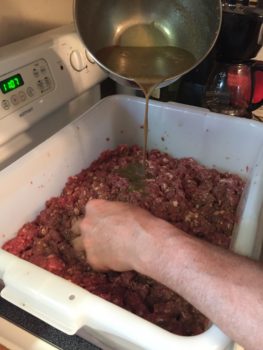
Prep seasoning by mixing with cold water, as instructed on package. Add seasoning and water mixture to meat, one cup at a time, mixing thoroughly after each cup. Keep meat mixture in meat tub and refrigerate overnight.
Step 4: Prep Casings
Prep casings by rinsing with warm water to remove cure and salt. Refrigerate in water overnight.

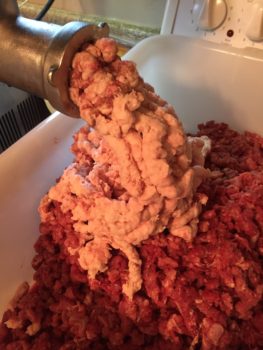
Step 5: Add Cheese to Meat
Cut cheese into ¼” cubes and mix thoroughly into meat.

Tips!
- Use any kind of cheese preferred. Pepperjack adds a little more spice and melts better when cooked. Cheddar stays in larger chunks when the brats are cooked.
- During this step, you can also add chopped peppers, such as jalapenos or habaneros, if you like spicier foods.
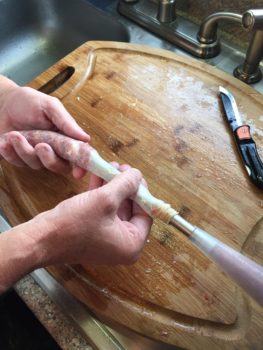
Step 6: Stuff Meat into Casings
Rinse casings with cool water. Attach 10mm stuffer tube (ok to use larger size) to sausage stuffer, and fill stuffer with meat. Fit casing over stuffer tube, and knot one end. Fill casings with meat until expanded, being careful not to rupture the casing. Once the brat is to the desired length, cut casing and knot the end. Repeat until all meat is used.


Tips!
- Using a standalone sausage stuffer makes the cheese stay in larger chunks. We used the Cabela’s Commercial Grade Stuffer, 11 lb. model. You can use the electric grinder without the blade in place to also stuff the casings, but it regrinds the meat, causing the cheese to break up.
- The small stuffer tube size is easier to fit the casings over without tearing them, but you can use larger size tubes.
- Brat length depends on preference. You can tie them at standard brat length, approximately 6”, but you will use more casings. We make ours approximately 18” and cook whole, then cut into thirds after cooking.
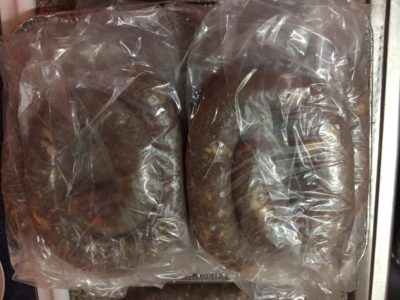
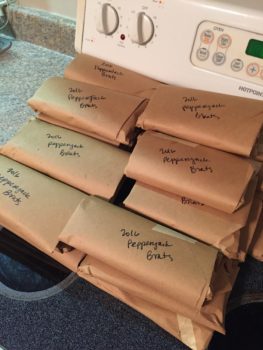
Step 7: Package and Freeze
Place brats individually in freezer bag and wrap with freezer paper. Label and freeze. Recommended meat storage is up to 1 year in the freezer to maintain flavor.
And the best part: Cooking and Eating!
Spray grill grates with non-stick cooking spray. Grill brats over direct heat on charcoal or gas grill for approximately 5 minutes per side, flipping only once using tongs to prevent puncturing. Enjoy alone, or on a bun with your favorite toppings.
By Sarah Honadel
Sarah is an avid hunter and outdoors enthusiast who lives on a farm in Kentucky where she raises cows, chickens,a nd keeps bees.. She enjoys gardening, canning, crafting and traveling and is also a member of the Huntress View team, an organization formed to help strengthen the ever growing community of women hunters.
Shed Hunting: Tips & Benefits
January 1st, 2017 by BTC Editor
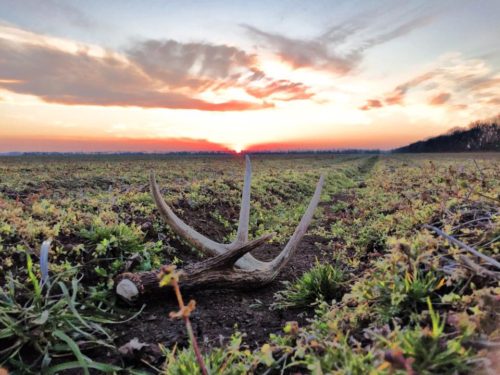
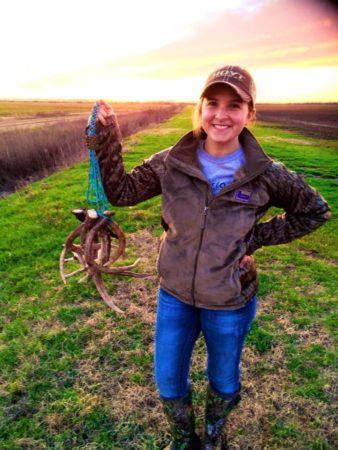
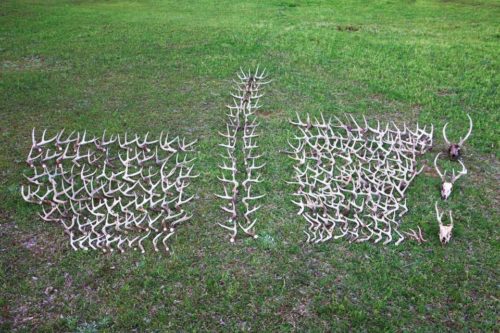
Anyone that knows me knows I’m a whitetail freak. I’m in love with hunting whitetail deer and everything that goes with it. However, as much as I love to hunt the actual deer, I am just as crazed about hunting their sheds after season is over. Picking up a shed antler gives me just as big of a rush as sitting in my stand and hearing a deer walking around on the fallen leaves in the timber.
This past shed season, my husband and I found over 200 shed antlers and 3 dead heads. I can’t begin to tell you how rewarding it has been. We were able to spend so much quality time together doing what we love, got in some serious leg workouts, and we even introduced our little girl to the sport. She came along on every shed outing and will have an eye for them before we know it.

In this article, I will be discussing benefits, tips, and ideas for what to do with your sheds.
Benefits:
There are so many benefits involving shed hunting. First and foremost, it’s a wonderful way to get in some quality time with family and friends. Finding shed antlers to an outdoor enthusiast is the equivalent to a child’s Easter egg hunt: extremely exciting, full of fun and the amount of pride that fills your soul when you pick one up. I’ll add, also, that it’s an excellent way to get in some serious exercise. Successful shed hunting requires a lot of walking, though some are lucky enough to have terrain accessible enough for four wheelers and/or horseback riding– both of which are effective ways to be successful. However, for those that don’t have land that is ATV accessible, get walking. Walk your food plots. Walk your trails. Walk your fence lines. Walk, walk, walk, walk, walk. Getting outside and walking your property for sheds gives you other advantages, like getting to know your deer herd’s travel patterns, and also what deer made it through the season. Plus, it’s just flat out fun.
Tips:
Like I stated previously, walking and/or driving/riding your property is key. You have to put in the time to be successful. Think like a deer, just as you would when considering what location to hang a tree stand or trail camera. Go places the deer go. Find their bedding areas and their feeding areas and you will be golden. Places where you know bucks will have to make hard landings, like jumping over fences or ditches are excellent places to look. Just because the rut has come and gone, doesn’t mean bucks don’t spar. With that being said, walk your food plots. Walk the open areas where deer congregate.
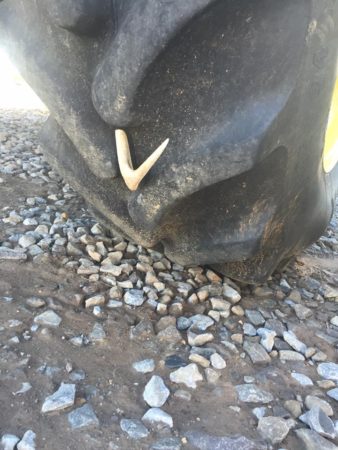
Something I also understand is that not everyone has their own land to go look on, which brings me to my next tip. Just ask. You would be surprised at how many people just don’t care for sheds, or better yet, want them off of their property: farmers especially. This past season, about 90 percent of the property I shed hunted on was from people that I had never met a day in my life, most of them being farmers. Sheds pose a threat to tractor tires and most farmers hate them. Almost every response we got when we asked for permission from farmers was, “find them all and take them all,” and most of them even gave us names and numbers of other farmers.
What to do with your sheds:
The fun doesn’t stop after you’ve picked up a load of bone. There are countless ideas to explore with your antlers. Decorating is my favorite thing to do, as I have sheds laying everywhere around the house. Nowadays, with websites like Pinterest, the creative opportunities are endless. I’ve seen everything from jewelry holders and fall decorations, to chandeliers and doorway entries. Believe it or not, there is actually a lot of money potential in your shed antlers if you’re willing to sell them. This year, while out, there were a couple of guys from Colorado in the area where we were hunting that were searching for sheds as well, and were willing to pay $16 dollars per pound. Crazy, right? I, for one, like to keep the ones I find.
With all that being said– get out there this upcoming shed season. It’s very rewarding and an experience that will develop into an obsession.
By Cajun Bradley

Cajun Bradley is a lifelong lover of hunting and the outdoors, especially waterfowl hunting. She is a member of the Huntress View team, an organization formed to help strengthen the ever growing community of women hunters.
Hunting With Outfitters
December 26th, 2016 by BTC Editor
Whether you have hunted with an outfitter before or are considering doing so in the future, here is a list of a few things you, the client, should think about before going. I believe the most important tip I can give you is to always be prepared when booking a hunt with an outfitter, especially if it will be in a different state. With that being said, communication with your outfitter and guide is the key to getting the most out of your hunt.
Come Prepared
- Know what your outfitter will provide based on the type of hunt you booked (i.e. lodging, meals, blinds, stands, fully-guided vs. semi-guided, etc.) Call your outfitter to see if they have any recommendations for what you’ll need to bring.
- On top of bringing the necessary tools to take your game, make sure that your equipment is dialed in. Do this before you leave and again once you arrive just in case something changed while traveling. You expect your guide to give you his or her best work so it’s only fair for you to do the same.
- Know the type of terrain you’ll be hunting so that you can be prepared physically and mentally. If you don’t know this already you can find this out by a quick internet search.
- Know the typical weather conditions so you can bring all the necessary clothing that you may need (i.e. rain gear; rubber, insulated or snake boots, etc.)
Listen to Your Guide & Be Open Minded
- Deer and turkey habits will vary state to state so what you are used to back home may not be what you’ll experience on this hunt. Remember your guide does this every day for a living in that particular area so they know what they’re doing. Trust their instincts with blind/decoy setup and take their advice on how to hunt that animal. A good example is turkey hunting: If your guide says they don’t do “run and gun” type hunting that usually means their hunters are more successful with the blind setups and the client being patient. Listen to that advice or else you’ll probably end up with an unsuccessful hunt.
- Remember that outfitters and guides can only do so much when it comes to animals and their behavior. If your guide did their job, you have listened to their advice and continued to take it then try not to put all the blame on the guide. Animals can be very tricky and can change their behaviors in a second.
Tips for the Hunt
- If you have physical limitations that require a different type of setup, make sure to tell your guide before you arrive so they can plan extra time for setup or can get extra help if needed.
- If you have a specific goal in mind, and it can work with your hunt, make sure to tell your guide so you can get the best overall hunt. Whether it be a trophy to take home, to be able to witness beautiful scenery, anything legal or you’re just looking for a relaxing trip, communicating this to your guide will make your hunting experience better. Remember to be open minded, sometimes trophies aren’t always available, spot and stalks aren’t recommended for certain animals or areas and sometimes the animals just don’t want to cooperate.
- Gun etiquette. This may seem like common sense but you’d be surprised how often people forget the direction their gun barrel is aiming. Not only is bad gun etiquette dangerous, it’s very inconsiderate to your fellow hunters. Whether the gun is loaded or not, always treat it as if it were. This could save a life and also help ease a little tension on the hunt.

Helping Your Guide
- If you’re able, asking your guide if they need help with decoy setup is very considerate. Most would love to have an extra hand to help set everything out as long as it follows the particular setup they have in mind.
- Most outfitters include cost to cover the cleaning of the animals but it’s always a good question to ask. If the outfitter takes care of this offering to help hold legs, head or wings back for them is always very much appreciated.
- Calling can be different depending on the type of hunt you’re going on and the outfitter. If the outfitter covers the calling but that is something you look forward to then make sure to let them know. A good guide will know when the clients’ calling won’t hurt the hunt.
- After you’ve taken your animal it’s time to get the perfect photo. Your guide will know how to get that beautiful photo of your harvest but if you have a particular pose or tradition in mind just let them know.
Camp/Lodge Manager
- Camp managers are used to cooking for a lot of people so usually that comes with a large mess. Just because you are away from home doesn’t mean it’s okay to leave more of a mess than necessary. Be considerate and try and pick up after yourself to show your respect for the outfitter and yourself. If you’d like to offer more than that I’m sure they would greatly appreciate it. They usually have the cooking part down but offering to help with dishes or setting the table can be a big help.
- Make sure to let them know ahead of time if you have any special dietary needs or allergies as this will help them with meal preparation.
Tipping
- Although it’s not really talked about tipping is very important to guides and how they make their living. Just like a waitress or any type of service business you deal with, you usually expect to leave a tip if you believe they did a good job. If you believe your guide did a good job then a good base percentage to tip is about ten percent. If you think they did a great job than show it with a great tip.
- Don’t forget your camp manager when it comes to tipping. If you believe they have done a good job then show them with a tip as well. Camp managers usually don’t get paid anything near what your guide does and they are usually up and working the same times.
Overall, be prepared by asking questions, being considerate and remembering to tip. This will make your hunt go smoother and all the more enjoyable.
Courtney is an avid hunter from Louisiana. She has a passion all things outdoors and is an avid hunter. She is also a team member of Huntress View, an organization formed to help strengthen the ever growing community of women hunters.
Using Trail Cameras in Trapping
December 18th, 2016 by BTC Editor
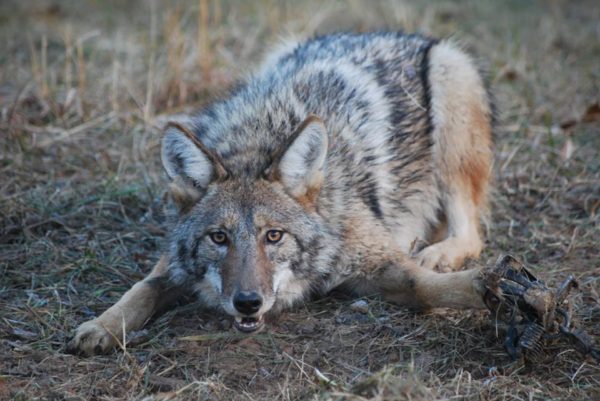
“Sometimes people wonder if animals are suffering or what exactly happens after they’re trapped. After an initial period of attempting to get away — which is why trappers run multiple swivel points and laminate the trap jaws so no paw damage occurs — the animal lies peacefully until the trapper arrives to check his traps. At that point, the trapper can decide to turn it loose or harvest it, depending on the conservation goals for the property he or she is trapping.
“Trappers are the best outdoorsmen there are,” the game warden replied when I told him I trapped. It was a routine license check while deer hunting, and once that formality was out of the way we began chatting. I don’t know if I fit into THAT category, but I certainly strive to learn all I can from those who’ve gone before me. Trappers settled this country, and their skillset often determined living or dying in those days. It’s a time-honored tradition where not much has changed: the methods, the techniques and even the equipment could easily be interchanged with those who came before us more than 200 years ago.
But there’s been one concession to modern, cutting-edge technology that has advanced the trapper’s knowledge more than any other single item: the trail camera. For years, we trappers have studied the tracks left behind of an animal at our sets, trying to figure out why he stepped here and not there. Snow is like a God-send to the trapper, and we’ll get out and follow a set of tracks for miles just to study the species we love to go after. What caused him to stray from the path he was walking there, and what attracted his attention enough to cause him to deviate from his destination?
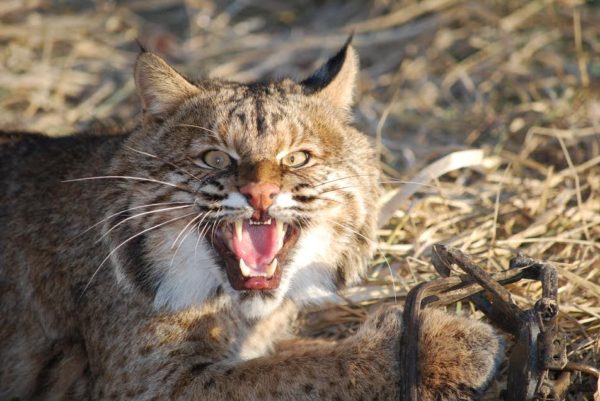
Staggs first recorded this nice bobcat visiting his set four days before the second time it made an appearance; another added benefit of using trail cameras while ‘cat trapping is helping to pattern them, as big males will often make a 5-day loop around their territory.
With the technical advances in trail cameras over the past decade or so, a treasure-trove of information is now readily available to the average person, and chief among those questions that get asked more than any other: How does animal XYZ work a set? Tracks give clues, but there’s nothing like actually WATCHING a bobcat tip-toe gingerly through your walk-through set… or a coyote approach your dirt-hole set from the side, because he didn’t know that the “front” of your set was the front.
Pictures are great, but video mode and the information it captures is priceless. Invisible night-vision infrared LED illumination is a must when capturing predators on video like this; if they see a red glow light up the area, they’re gone … and unlikely to return. Give it a try sometime if you’re a trapper, and see how much your knowledge base is increased. Or, even if you’re not a trapper, you may enjoy expanding your horizons beyond merely trying to capture deer on camera. The next time you’re in a Bass Pro or Cabela’s, or even an old hardware store that may have a trapping section, pick up a bottle of gland lure. Dip a bit out with a Q-tip and place it under a fallen limb on the forest floor. You may be amazed to see the number of predators you get video of which you had no idea were around.
Greg Staggs is the former back-page columnist for Inside Archery, and his writing regularly appears in such magazines as Outdoor Life and Petersen’s Bowhunting. Staggs loves introducing his two boys to all things outdoors, including fishing, trapping, canoeing and camping, and has been chasing turkeys and big game exclusively with archery equipment for over 20 years.
Late Season Trail Camera Placement
December 11th, 2016 by BTC Editor
As deer season is winding down and will soon be coming to an end, now is the perfect time to re-position your trail cameras and change your game plan for hunting late season whitetail bucks. As the seasons change, so does a whitetail’s pattern as they shift their focus from the rut to food once again. Here are a couple of tips on trail camera setup and placement to help you get the most out of your cameras before deer season closes.
Camera Location: Pinch Points and Travel Corridors
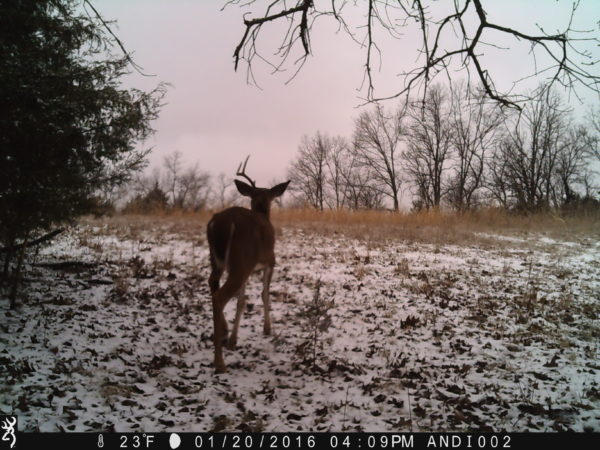
While I move most of my cameras to new locations post-rut, I still like to leave one or two at prior locations like pinch points, known deer trails and travel corridors to catch any bucks that may still be out cruising for does. As the fawns come into estrous late in the season, often referred to as the “Second Rut”, these locations are great for catching buck movement in the daylight. It appears to me that is exactly what is going on in the next series of pictures.
![1632:120416:45F:0000:ANDI :2E[097:0494]G[024:0x0016]](http://btc-omrc.com/wp-content/uploads/2016/12/IMG_0047-e1481494823717.jpg)
![1700:120416:45F:0000:ANDI :2E[099:0453]G[024:0x0016]](http://btc-omrc.com/wp-content/uploads/2016/12/IMG_0069-e1481496091319.jpg)
![1704:120416:45F:0000:ANDI :2E[097:0494]G[024:0x0016]](http://btc-omrc.com/wp-content/uploads/2016/12/IMG_0089-e1481496451232.jpg)
My Setup
- Camera: Browning Strike Force
- Mode: Burst Mode, 4 shots
When placing my cameras at the above locations, I like to set them up on burst mode to make sure I don’t miss any deer activity. For example, say I had my camera set up to take a picture every 5 seconds, but in normal mode. If this buck would have been trailing this fawn right on its tail, I may not have gotten a picture of him. In burst mode the camera takes several images, one after another, before stopping to reset.
Camera Location: Food Sources
Moving trail cameras to the remaining food sources is a good strategy for late season scouting. By now most of the acorns have either rotted or been eaten, so I like to move more of my cameras from the woods to our food plots in the fields. We have a couple of fields planted in winter wheat, clover and chicory, and another one planted in turnips. These have proven year after year to be the hot spots on our property for hunting late season bucks, and this year is no different! After checking my cameras this weekend, this buck has shown up in the daylight hours almost every day in one of our wheat and chicory plots.
![1440:120616:52F:0000:HAAS :2E[142:0070]G[008:0x0006]](http://btc-omrc.com/wp-content/uploads/2016/12/IMG_0578-e1481470633184.jpg)
![1615:120816:29F:0000:HAAS :2E[140:0076]G[008:0x0006]](http://btc-omrc.com/wp-content/uploads/2016/12/IMG_3681-e1481497272261.jpg)
My Setup
- Camera: Browning Strike Force
- Mode: Timelapse Mode
The Timelapse mode on my Browning Trail Cameras is perfect for watching bigger open areas, like our food plots. For the most part, we know where our deer are entering this field, which is why I put this camera where I did. But, deer will often be in that same location and you’d never know it because they are too far away to trigger the camera. Timelapse Mode solves that problem since it can capture game at 200+ yards away. Plus, you can easily view a full day’s worth of pictures in just minutes, thanks to the Buck Watch Timelapse Viewer Plus software that is included with every Browning Trail Camera.
If you still have a deer tag you’re trying to fill, utilize your trail cameras as best you can. They are a deer hunter’s most valuable scouting tool! I shot my biggest buck to date on the last day of Missouri’s 2014 archery season as he was making his way into our turnip plot. Had I not been watching and patterning him with my trail cameras, I may have picked a different stand in that food plot and missed my chance at him.
Aside from avoiding tag soup, there are other benefits to keeping your trail cameras out during late season. Use them to help take inventory of what deer survived the season, determine your buck to doe ratio, and age of your deer. Looking over this season’s pictures, as well as pictures from prior season, will help you determine your game plan for next season. Another benefit to keeping your cameras set up so late in the year is to aid with shed hunting. Once you start getting pictures of bucks dropping their antlers, you’ll have a better idea of when and where to start looking for sheds.
Deer season isn’t over until it’s over, so if you’ve already taken down your game cameras for the year, I recommend getting them back out! The above late season trail camera locations and setups have helped me fill my deer tags in the past. Even if I don’t fill my archery tags this year, I have already gained some valuable information to carry over into next season, thanks to my Browning Trail Cameras!
By Andrea Haas
Andrea Haas is a Pro-Staffer from Missouri who enjoys hunting deer, turkeys, and upland birds. She is also the founder of the Huntress View, an organization formed to help strengthen the ever growing community of women hunters.
A Hunter’s Widow, Married to a Hiking Widower
December 4th, 2016 by BTC Editor

Southwest Missouri resident Jessi Dreckman, who is married to an avid hunter, says deer season for non-hunting spouses shouldn’t be spent inside as “the hunter’s widow(er).” Instead, she urges those individuals to learn to love their spouse’s passion for hunting, and to get outdoors and find their own passion.
I’m the type of woman who has been known to spend 15 minutes, tupperware container in hand, trying to trap a red wasp that had wandered itself in my bathroom in order to take it outside and release it safely.
I’m the type of woman who has been known to spend the morning cooking warm oatmeal and delivering it to the hen house out back when there is two foot of snow on the ground, just to warm the bellies of my little egg producers.
I’m the type of woman who releases fish I catch. Even the really, really big ones.
I’m the type of woman who has been known to relocate the snakes I find in our yard down the road a ways instead of taking the shovel to them.
So, my love for hunting may not be immediately apparent to those who first meet me. But in addition to being that type of woman, I’m also the type of woman who fell head over heels in love with a hunter – and therefore, hunting itself.
My husband Drew and I have been together through thick and thin for 13 years, ever since our first date when I was just 16 years old. We’re opposites in many ways, but our mutual avid love for the outdoors that unites this opposites-attract couple in a way nothing else can.
So when the air turns cool and crisp and the leaves start to brown, I try not to hark on the fact that the season of being a hunter’s widow begins. Don’t get me wrong, the time my husband is home during September through February is minimal, but hunting season is also backpacking season. So it’s a time of adventure for both of us in different ways.
So, while Drew is waking up before dawn to find his way to a tree, I’m waking up shortly after to the trail head. When his heart jumps to the sound of the crinkle of leaves beneath him, my heart is pumping from hiking fifteen miles with a 30 pound pack on my back. When he is in his deer stand, close to the heart of nature, I am on my feet under the treetops, heart just as full. And when we do have precious moments together, we spend it with one another in the outdoors. My heart-pumping orienteering trip through the forest is an opportunity for Drew to scout for deer. His trip to put up a deer stand is an opportunity for me to tag along and test out my new hiking boots. And when he’s made a kill and we sit down to butcher and process deer, we share our separate stories of our adventures with one another. And we love every minute of it.
The truth is, although we spend our time in different ways, our hearts are very much the same. Through our time outdoors we’ve developed patience, determination and passion – and our love has only grown.
So to all of you fellow non-hunting spouses out there, please don’t spend hunting season alone focusing on your partner’s lack of presence. Instead, use those precious moments to go do what you love. Because when you find your own way to feel that same passion and fire, you realize it isn’t specific to any one hobby – those traits translate to life and love too. Get out there and find what makes your soul come alive!
Traveling With Firearms – Part 2
November 27th, 2016 by BTC Editor
The Good, the Bad and the Ugly: Taking your Firearm Hunting in Foreign Countries
As a hunter, your gun is your best friend. You have spent many hours with it, target shooting, in the stand, bumping around in the back of the truck; it becomes more than just a gun to you. Of course, no matter where in the world you are hunting, you want to take your best friend with you, but that is not always possible. When planning an international hunting trip it is always important to know the rules and regulations around carrying your own firearm for hunting purposes.
First, every country is different. In Wild West terms, I will do the Good, the Bad and the Ugly in reverse, starting with the unfriendly or not-so-friendly countries. Argentina offers great hunting opportunities for fowl, red stag, black buck and other species, but you cannot bring your own gun. Outfitters will offer many options for rifle and shotgun rental and ammunition. You might miss your best friend on this trip, but it will still be a great experience.
Another Spanish speaking country that offers beautiful scenery, wonderful hunting and great food, but difficulty with guns is Spain. The Ibex grand slam might be on your list of dream hunts, but if you want to take your own rifle, you need to start your planning at least six months in advance. Paperwork must be filed through the Spanish Consulate in the United States. Depending on where you live, this office could be located in a few different cities and you must file with the right one for your resident location. Getting representatives to answer phone calls or respond to emails can be an issue. This is another country where it is best to coordinate a rifle with your outfitter.
The last on my list of difficult countries: Australia. I love Australia, the beauty of the outback, the friendliness of the people, the remote locations where all you see for miles and miles are red dirt and wallabies, but if you want to bring your own gun, be prepared. There is a lengthy amount of paperwork that must be filed before you leave. This includes police reports from your hometown, submitted to Australia and returned to you. The process should be started a minimum of three months before you leave. This also requires a fee of over $100 USD, but it must be paid in Australian dollars. Your outfitter will help you with all of this, but it is an added headache for you and them. There is now also the issue of leaving the country. Additional paperwork must now be filed in order for you to take your gun out of the country when you leave. If you are planning on doing any additional touring while on your Australia trip, please leave your gun at home. Each state requires you to have a firearms license to transport your firearm in that state. You cannot get a firearms license unless you are hunting with an outfitter in that state. Therefore, if you are hunting in the Northern Territory and you bring your own gun, you have permission to have the gun in the Northern Territory, but if you would like to travel to Sydney after your hunt, you do not have permission to have a firearm in New South Wales. My advice, use a firearm provided by your outfitter when hunting in Australia.
Now that the Ugly is out of the way, the Bad. These countries might have a bad reputation on the global front, but they are quite friendly to firearms for hunting. Two of my dream hunts, an Ibex in Turkey and the big boy Marco Polo in Tajikistan. Both countries might make the news politically, but your outfitter will get your gun through on arrival. Make sure you communicate with your outfitter and let them know what you are bringing so they will have everything taken care of when you arrive.
Finally, the Good. New Zealand. My favorite place to hunt, so far, and an easy country to bring your own firearm for hunting. There is a $25 NZD fee on arrival and your guns will be inspected by the police as you go through customs. That’s it. Make sure your firearm is in a hard case with lock, stored with no ammunition in the chamber and the magazine is separate if it is full. Now you are free to enjoy the beauty of New Zealand and the wonderful hunting opportunities that abound in this country down under.
Africa has been left for last, one because it is fairly simple, two because it is a continent, not a country. There are quite a few countries within Africa to hunt. Make sure you coordinate with your outfitter in case there are specifics for your desired location. There is usually just paperwork on arrival. An agent can be pre-booked to meet and greet you and get your firearms through quickly. It is worth the money to take this route.
The most important part of traveling with firearms is preparation. Make sure you ask your outfitter what needs to be done for your specific hunting location. Talk to other people who have been to that country hunting and get their opinion and experience. It might be difficult to leave your best friend behind on your hunt of a lifetime, but that is a better option than getting it confiscated by the government of a faraway place. And that, is the Good, the Bad and the Ugly of traveling with firearms.
By Lora Gene Young
Lora Gene Young is an avid outdoors-woman from North Carolina. Lora guides hunts in both New Zealand and Australia and is also a member of Huntress View, an organization formed to help strengthen the ever growing community of women hunters.
Traveling With Firearms – Part 1
November 21st, 2016 by BTC Editor
Hunting trips are times to relax, be one with nature, enjoy the great outdoors and camaraderie with like-minded peers, and bond with family. No matter the reason for your hunting excursion, quarreling with airlines over firearm transportation is the worst way to start your journey. Here are a few tips to help you start your trip on the right foot.
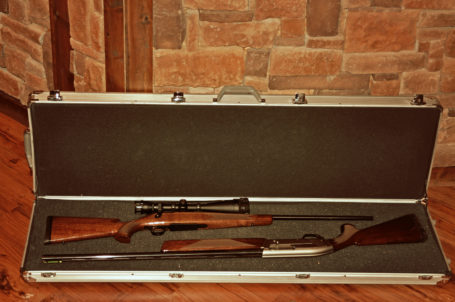
First and foremost, firearms must be transported in a hard case. There can be multiple guns within each hard case, but it must be a hard case. Next, in conjunction with the hard case, the case must be able to be locked securely. Most cases have reinforced locations for two locks, some have a metal rod with one lock. If there is a place for two locks, many airports require both locks. Even if your departure city airport does not require both locks, when you leave your hunting destination that city airport might require both locks. It’s best to cover all bases and have all locks in place.
Secondly, firearms must be transported unloaded. Make sure you double check that the magazine is not in the gun and the barrel is clear. The bolt/action can be transported in the gun, but the gun must be clear of ammunition. Though the firearm must be clear of ammunition, ammo can be transported in the case with the firearm.
Finally, firearms are checked baggage. Just like other checked baggage make sure you know the weight limits associated with your airline. Most have a 50 pound limit, but double check before hand so you do not have any trouble at check-in.
Lock your empty firearm in a hard case and enjoy your vacation. Bon voyage!
By Lora Gene Young
Lora Gene Young is an avid outdoors-woman from North Carolina. Lora guides hunts in both New Zealand and Australia and is also a member of Huntress View, an organization formed to help strengthen the ever growing community of women hunters.
